A thorough and definitive look at the causes of flicker in stop motion animation and the ways to get rid of it.
This video has all the content from this post along with visual evidence of the anti-flicker steps in action.
If you prefer to read, then scroll on.
The quickest answer to completely rid your productions of flicker, is that you need a combination of manual lenses and longer shutter times than you may want, or have planned for. You also should do all the basic staging and preparation things listed here to mitigate the flicker effect.
A short background on my qualifications to make this.
I’ve been animating for a decade. I’m not quite a professional, but I have spent a lot of time during those 10 years teaching the medium and scouring the internet for tutorials and tips on everything stop mo.
For my entire career, until just recently, I was working under the assumption that there is a magic wand solution to flicker that I just hadn’t figured out. Or that there was a lens or device I just hadn’t purchased yet. There are many flicker tutorials online, but many of them are wrong or incomplete. Then there’s the endless forum posts of people experiencing flicker and the community throwing out every possible solution until the conversation fades away, or the OP’s flicker mysteriously ends. I’ve tried all of the posted techniques, acquired a lot of tools and recently implored the help of several professionals.
Here’s the steps.
Shadowplay is Not Flicker
I lit one of my first animations with halogen work lights from home depot hung all over the room behind me and the camera. I was shooting on an old Canon Powershot and wasn’t using software at the time to monitor my work, so I was pretty devastated to see my shadow playing all over the footage once I had it all in editing.
To rid your animations of shadow play, you must stand behind your light sources while taking photos. If you’re not using frame grabber software yet, find a device, like a Bluetooth shutter, that will allow remote access of your camera, so you can stand farther back.
If you’re animating under ceiling mounted fluorescent lights, just be aware that they cast shadows in every direction and stand far away from your set.
Your camera must be in manual mode
All the other modes on your camera have automated functions taking place in the camera body. Most frame grabber programs won’t let you proceed without being in manual mode anyway.
If you’re filming on a phone or device, get a photo app that provides as much manual control as possible, or use a stop motion app like Stop Motion Studio which has the ability to lock focus, exposure and white balance.
Black out your room
Every conceivable light source needs to be covered. Put gaffe tape over electronic devices in the room that may have LEDs or emit artificial light constantly. Thor Labs is an awesome company that supplies black out materials designed for laboratories and sold at fair prices. Follow the link for their blackout selection.
I use their blackout fabric, tape and aluminum foil.

After everything is blacked out, be aware that any light-colored surface in your room can reflect your stage lights and create flicker. I painted the wall behind my normal set location matte black. Ideally, you would surround your entire set with black curtain, like you can see in all the professional’s videos online. I personally don’t have the space for that and get away without them just fine.
If you’re using a frame grabber software like Dragonframe that allows your monitor to black out while taking a shot, turn that setting on.
Light can also reflect off your own body, so be sure and wear dark clothing while animating. It’s also important to stand in a regular position when taking a photo to avoid any possible light changes in light reflections that may come off you or from around you.
Controlling the amount of light spill on the sides of your lights going to random parts of your room will help. You can use barn doors for this, but clothes pins and black aluminum foil controls the spill better in my opinion, and is inexpensive.
Basic Lights
It could be that your lights are old and crappy. I’ve seen people on the forums saying that they had issues with this. I tested my old crappy home depot halogen work lights with basic, not-so-perfect, camera settings and lens options, and they actually did pretty well. If nothing else in this video fixes your issues, then look at upgrading your lighting setup.
I currently shoot with cheap PAR cans and halogen bulbs and I’ve become pretty certain that mine are very susceptible to line voltage fluctuations. But following lens and shutter rules from later in this tutorial gets rid of any flicker that they cause.
Power and Voltage
Most of us are shooting in home studio situations and reliant upon the condition of the power coming into our homes. Wherever you choose to shoot, it should be on a circuit dedicated just to your work. However, that’s not always enough. My home has weak power and whenever the laundry is running, everything is affected. I can see my studio lights flicker in real time when the laundry is running. It’s also possible that your power can even be affected by somebody in a neighboring building running a power sucking device.

The voltage running to your lights needs to be as even as possible. For me in the United States, I want to see 120.0 volts running constantly and not fluctuating. There are a few devices that can, and also sort of can’t help do this:
UPSs, or Uninterruptible Power Supplies, bring the voltage in from your mains, store it up in an emergency battery and then send it out a little more evenly. I purchased a $600 CyberPower pure sine wave UPS after reading claims of these devices helping others on the stop motion forums. Most UPSs, and especially this more ‘inexpensive’ model, don’t focus so much on voltage regulation, but still do a good job. This UPS didn’t work for me due to a combination of my poor power situation, its warranty-stated allowance of a +/- 2% voltage variance and my really cheap-o PAR can lights.
An incredible and thorough adobe blog tutorial about flicker makes one big mistake in suggesting the purchase of a variac transformer to even out your voltage. A variac transformer only changes an input voltage from the mains to an output voltage that you set. It has no internal mechanism to stabilize the voltage. Do not purchase one of these.
Update: Since posting this blog, a few animators have said that adjusting a variac to the needed voltage right before taking a shot could work, but this does not change the fact that a variac transformer has no ability to withstand spikes and changes in voltage coming in from the mains.
What you need is a line or power conditioner. Its sole purpose is to attempt to even out voltage to a factory preset standard or one that you set. I got this one made by Tripp Lite on Amazon for $120 and it keeps the voltage coming out of it relatively stable.
The variance in my voltage is not bad enough to warrant the flicker that I can see coming from my lights, even with the laundry running. That puts the problem then on my cheap PAR can lights and a little bit on the line conditioner. Reliable stability in voltage is not possible with my current set-up, but I believe with higher quality lights and a higher quality power conditioner, it would be.
Know and Understand Your Lights

Fluorescent lights flicker by nature. If you’re shooting under fluorescents and getting flicker in your shots, your only option is to increase your shutter time until you’re satisfied with the result. Most fluorescents don’t dim either, so running a dimmer on them will usually cause problems. Shutter speeds will be discussed more in the lens section, but briefly for now, the longer your shutter is open the more light is sampled from the scene. Many professionals prefer a 1 second long shutter, which means their stage lights are kept pretty dim, but this longer light sample rids your shots of flicker by catching a broad sample of the voltage variance of your lights in every shot. There will be a lot of evidence of this later, but it’s important to know that your lights still need to be steady in voltage and you likely need to be able to dim them somehow.
Incandescent lights can work and they can be dimmed, but I don’t know anyone that uses them in a film setting, so can’t say that they’d be a good idea.
Halogens and LEDs are what most animators use.
If you’re seeking or have a lighting setup with LEDs, you will need to know the specifications and potential limitations of the bulbs. There’s a large array of varying quality and uses that LEDs are made for. All of them can dim with conventional dimmers, but with differing results and LEDs just black out below 10% with the conventional ones. Higher end LEDs have compatibility with an enhanced dimming method and can do incredible things. Fiilex lights creates mid-price range lights that are truly impressive and they state are completely flicker free. Some of them are DMX and Dragonframe compatible as well, but have to be run with their proprietary DMX dimmer pack (update 11/2017: I got my hands on some Fiilex lights and after a lot of difficulty found that they did not communicate with Dragonframe. I cannot recommend this brand for a DMX setup). Standard packs won’t communicate with the lights properly. There are many online lightbulb sellers with blog posts about LEDs and dimming, so figure out what you want to get and do some research first.
I currently use an inexpensive setup with PAR cans and halogen bulbs on a DMX dimmer pack. Halogen bulbs provide a lot of light, have great dimming fluidity and don’t get too hot. My PAR can setup is very susceptible to changes in line voltage. When I was making animations with the lights plugged directly into my mains, there wasn’t much of a way to avoid flicker other than longer shutter times. Even with the lights running through the line conditioner, I will see visible real time flicker if someone in the house runs the laundry. The quality of a halogen or tungsten setup seems to come down to the quality of the housing that the lights sit in and how well it can withstand subtle voltage fluctuations.
In general, regardless of a solid lighting setup, longer shutter times are still pretty necessary.
If you’re looking to spend some money, the premiere brand of studio lights are Dedo. Their bulbs are typically Fresnel, they have all kinds of technology in them that helps even out line voltage, consumes little power and can do all kinds of fancy angles and beams.
Dimming
If you’re animating your lights via a dimmer, you may have to invest in a way to automate your system. I have used manual plug-in dimmers quite a bit. The first issue is that they introduce another device in your voltage’s path to your lights and that can cause more variance. If attempting a slow light fade, the subtle differences between each dimmer setting movement you make, can cause a stutter in the lights that could be mistaken for flicker. Automating this system through a dimmer pack that will communicate with your frame grabber will keep your fades even and save you a ton of labor time. It’s a few hundred-dollar investment, but it is worth it and so easy to control inside a comprehensive program like Dragonframe.

White Balance
A camera’s white balance can never be set to auto. I was using a lower end Canon T3i for my last animation and it doesn’t have a color temperature white balance setting. I didn’t like any of the white balance preset options, so I took a risk and went with auto white balance and a faster shutter speed. I got a lot of flicker from the pancake prime lens I was using and that fast shutter, but I also got a subtle frame-by-frame change in the color. Especially noticeable on white. If you film with auto white balance on and a long shutter, you actually get a pretty cool color changing effect. Put that one away in your tool kit.
Camera Settings
Cameras are made to take photos and they have all kinds of helpful settings enabled within the menu to make those photographs as good as they can be. You need to go into your camera’s menu and disable everything that looks like it will try to correct your images. If you are using Dragonframe as your frame grabber, they have a helpful tutorial in their camera section for every camera that is compatible with their software.
That all said, we finally get to the most important thing for eliminating flicker:
your lens choice and your shutter settings.
Brief Lens Review
Prime lenses have a fixed focal length. That just means they don’t zoom. You’ll see one number followed by mm printed on the lens somewhere. That stands for the millimeter distance from the lens to the focus. A lower number is a wider lens which can see a wider area and focuses on a greater depth of field than a telephoto lens which sort of sandwiches the plane of view and allows for focus on one tight area.

Zoom lenses are capable of changing their focal length. The range of their zoom will be printed on the lens with two numbers.
Then there are manual lenses which allow for the control of the aperture to take place on the lens instead of mechanically within the camera body. Most manual lenses are prime. There are manual zoom lenses, but you must make sure that it is not a variable aperture zoom lens that changes the aperture throughout the zoom automatically. It’s a handy feature for shooting film with a DSLR, but not animation. Modern non-variable aperture zoom lenses cost thousands of dollars, but there are old used ones out there. I got a used Nikon manual zoom lens for $50 at my local camera store and it performs amazingly well under optimum shutter settings.
Eliminating flicker requires a manual lens. If the aperture is controlled from within the camera body, the camera readjusts the aperture between shots, causing micro differences in the amount of light hitting the sensor between each shot, causing a subtle flicker.
Lens Adapters
In the tests I performed and which can be seen in the video, I used 6 different types of lenses and 3 different Canon bodies. The setup recommended by the professionals and the premier frame grabber software, Dragonframe, is a Canon DSLR body and a manual Nikon lens attached with an adapter ring. There are tons of adapters online. For stop motion, you need to have a basic metal ring without any additional aperture or focus dials or installed sensor chips. The basic metal ones are fortunately the cheapest options and will allow for complete separation of the lens controls from the camera body.

Disengaging the Lens Sensor
There is a theory running around stop motion forums, that if your lens is manual, but is still communicating with the camera body, because they are made to be compatible or you got a high-end adapter with sensors, then you can slightly disengage the lens, so the sensors aren’t touching and that will prevent aperture wiggle between shots. You can see in the video tutorial that that approach doesn’t affect flicker results at all. Anyone claiming to have had that method work for them, probably just changed their shutter speed at the same time and attributed their success to the lens disengagement. Slightly detaching the lens also presents the danger of the lens suddenly dropping out of the camera while filming
Shutter Speed
A manual lens alone is not enough. If your shutter speed is set too fast, then you will capture the small variances in voltage running to your lights. This will cause a greater flicker sensation than any other thing listed in this entire tutorial. For this reason, many professionals shoot with shutters as long as 1″.
The perfect combination is a Nikon manual lens, with a basic adapter to a Canon body. But I also did a test with an old manual Minolta lens and a glassless macro adapter and it performed just fine with a one second shutter speed as well.
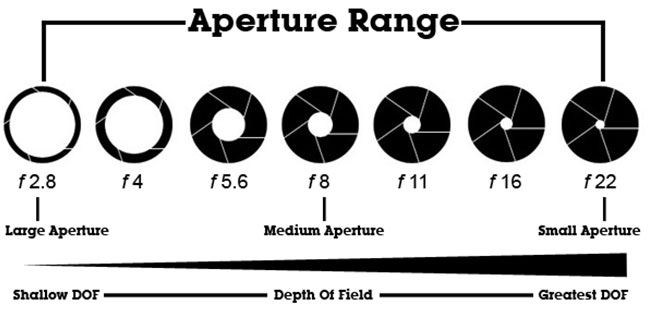
For the large studios, shooting with a long shutter doesn’t just rid their shots of flicker, it also saves on the electrical bill. The shutters are open for so long, that the apertures are closed tight and the lights have to be kept dim. They also attempt to keep the ISO as low as possible to prevent graininess from playing in the image.
But having to stop the aperture way down sacrifices all of the control a photographer has in creating a sense of depth of field through the interaction of shutter and aperture. A nearly closed aperture and a long shutter makes for the greatest depth of field the lens will provide. That means, stop motion animators are left with only two choices to be able to create depth with a lens: either increase the shutter time and risk introducing flicker, or create depth through lens choice. The first option is terrible, because even if your viewers may not be bothered by a little flicker, it will probably drive you crazy. The second option is expensive.
View the video tutorial for evidence of all these different settings.
Thank you for your visit here and good luck with your projects!
Referring to the Adobe blog tutorial you mention: I wonder why they only mention Nikon type G lenses? Have you ever herd of a manual Nikon type G lens being used for stop motion animation?
https://blogs.adobe.com/creativecloud/reducing-flicker-for-stop-motion-animation-and-time-lapse-photography/?segment=dva
Since I said “the best” setup is a nikon manual lens to canon body and longer than expected shutter time (multiple times), I failed in getting across the important subtext that you can get by with ANY type of lens as long as you lengthen your shutter time and follow all of the other basic rules. You can make them work. They may not be as perfect as a manual lens, but it will be close.
I was surprised to see an Instagram post recently from Pes where Nikon sent him a King’s ransom worth of lenses in an assortment of prime and zoom, but none of them manual. Seemed like a waste to me at first and maybe he thought so too, because he crushed them with a hammer.